> ## Documentation Index
> Fetch the complete documentation index at: https://docs.usehatchapp.com/llms.txt
> Use this file to discover all available pages before exploring further.
# Setup Guide
> Get a walkthrough of all the steps you need to set up your first AI agent in Hatch.
### What are Hatch AI Agents?
Hatch AI Agents allow you to create custom AI bots that converse with your leads, prospects, and customers over text or voice, then take the appropriate action in Hatch based on the conversation outcome.
Hatch AI doesn't simply recommend responses or provide coaching for your agents; it actually converses with leads and customers just as a human agent would - and according to the instructions and prompts you create.
### AI Agent Playground
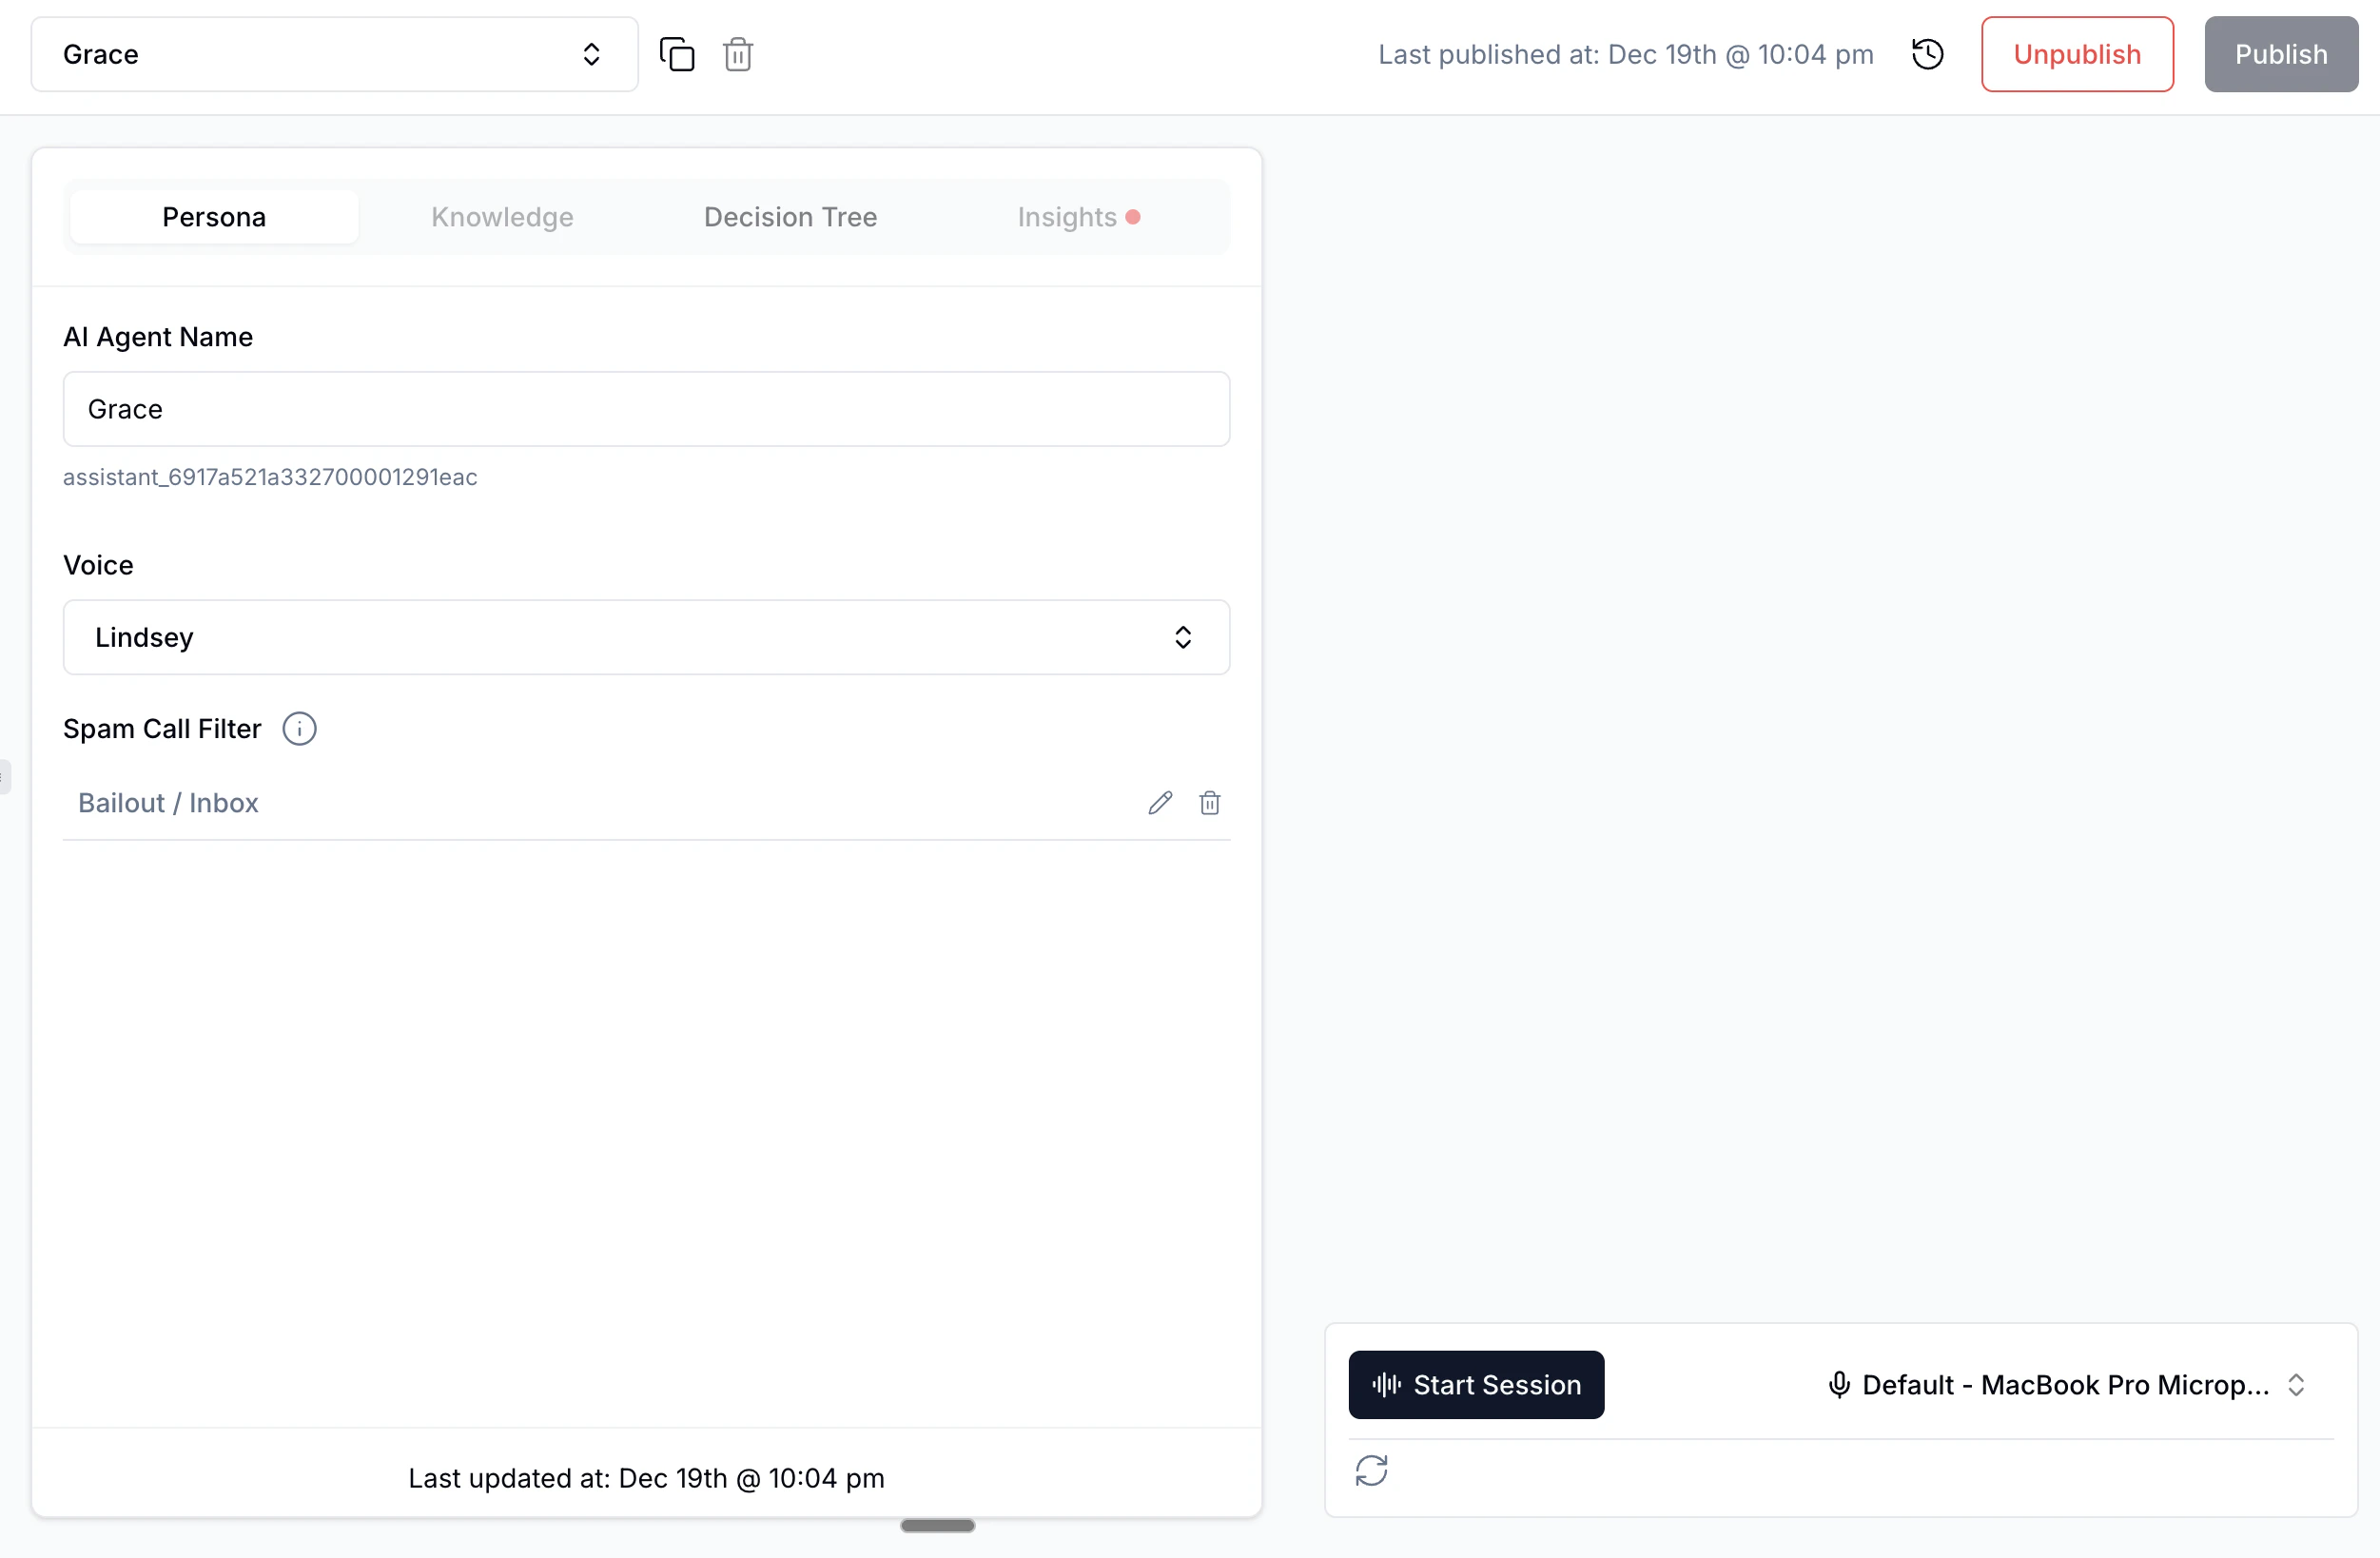
The AI Agent playground is where you configure and test your bot. It has four main tabs:
* **Persona**: Configure your bot's name, voice, and personality
* **Knowledge**: Set up your business profile, FAQs, documents, and customer data
* **Decision Tree**: Configure triggers, greeting messages, and AI agent instructions
 ***
## Persona Tab
The Persona tab is where you define your bot's identity and behavior settings.
### AI Agent Name
Give your bot a name that will be used when introducing itself to customers. Choose a name that fits your brand and feels natural in conversation.
### Voice
For Voice AI agents, select the voice your bot will use when speaking to callers. You can preview different voices to find one that matches your brand personality.
### Spam Call Filter
Configure how your bot handles potential spam or abandoned calls.
**How spam calls are detected:**
A call is classified as spam/abandoned when the caller:
* Immediately hangs up after connecting, OR
* Doesn't speak within 10 seconds of the greeting
The detection works in two phases:
1. Your bot greets the caller and waits 5 seconds for a response
2. If no response, the bot repeats the greeting and waits another 5 seconds
3. If still no response after 10 total seconds, the call is marked as spam/abandoned
**What happens when spam is detected:**
When you enable the Spam Call Filter, you can configure:
* **Column**: Which salesboard column to move the conversation to
* **Disposition**: What disposition to assign to the call
The bot will politely end the call and the conversation will be routed according to your settings, keeping your inbox clean from abandoned calls.
***
## Knowledge Tab
The Knowledge tab is your bot's brain - it's where you provide all the information your bot needs to answer customer questions accurately.
***
## Persona Tab
The Persona tab is where you define your bot's identity and behavior settings.
### AI Agent Name
Give your bot a name that will be used when introducing itself to customers. Choose a name that fits your brand and feels natural in conversation.
### Voice
For Voice AI agents, select the voice your bot will use when speaking to callers. You can preview different voices to find one that matches your brand personality.
### Spam Call Filter
Configure how your bot handles potential spam or abandoned calls.
**How spam calls are detected:**
A call is classified as spam/abandoned when the caller:
* Immediately hangs up after connecting, OR
* Doesn't speak within 10 seconds of the greeting
The detection works in two phases:
1. Your bot greets the caller and waits 5 seconds for a response
2. If no response, the bot repeats the greeting and waits another 5 seconds
3. If still no response after 10 total seconds, the call is marked as spam/abandoned
**What happens when spam is detected:**
When you enable the Spam Call Filter, you can configure:
* **Column**: Which salesboard column to move the conversation to
* **Disposition**: What disposition to assign to the call
The bot will politely end the call and the conversation will be routed according to your settings, keeping your inbox clean from abandoned calls.
***
## Knowledge Tab
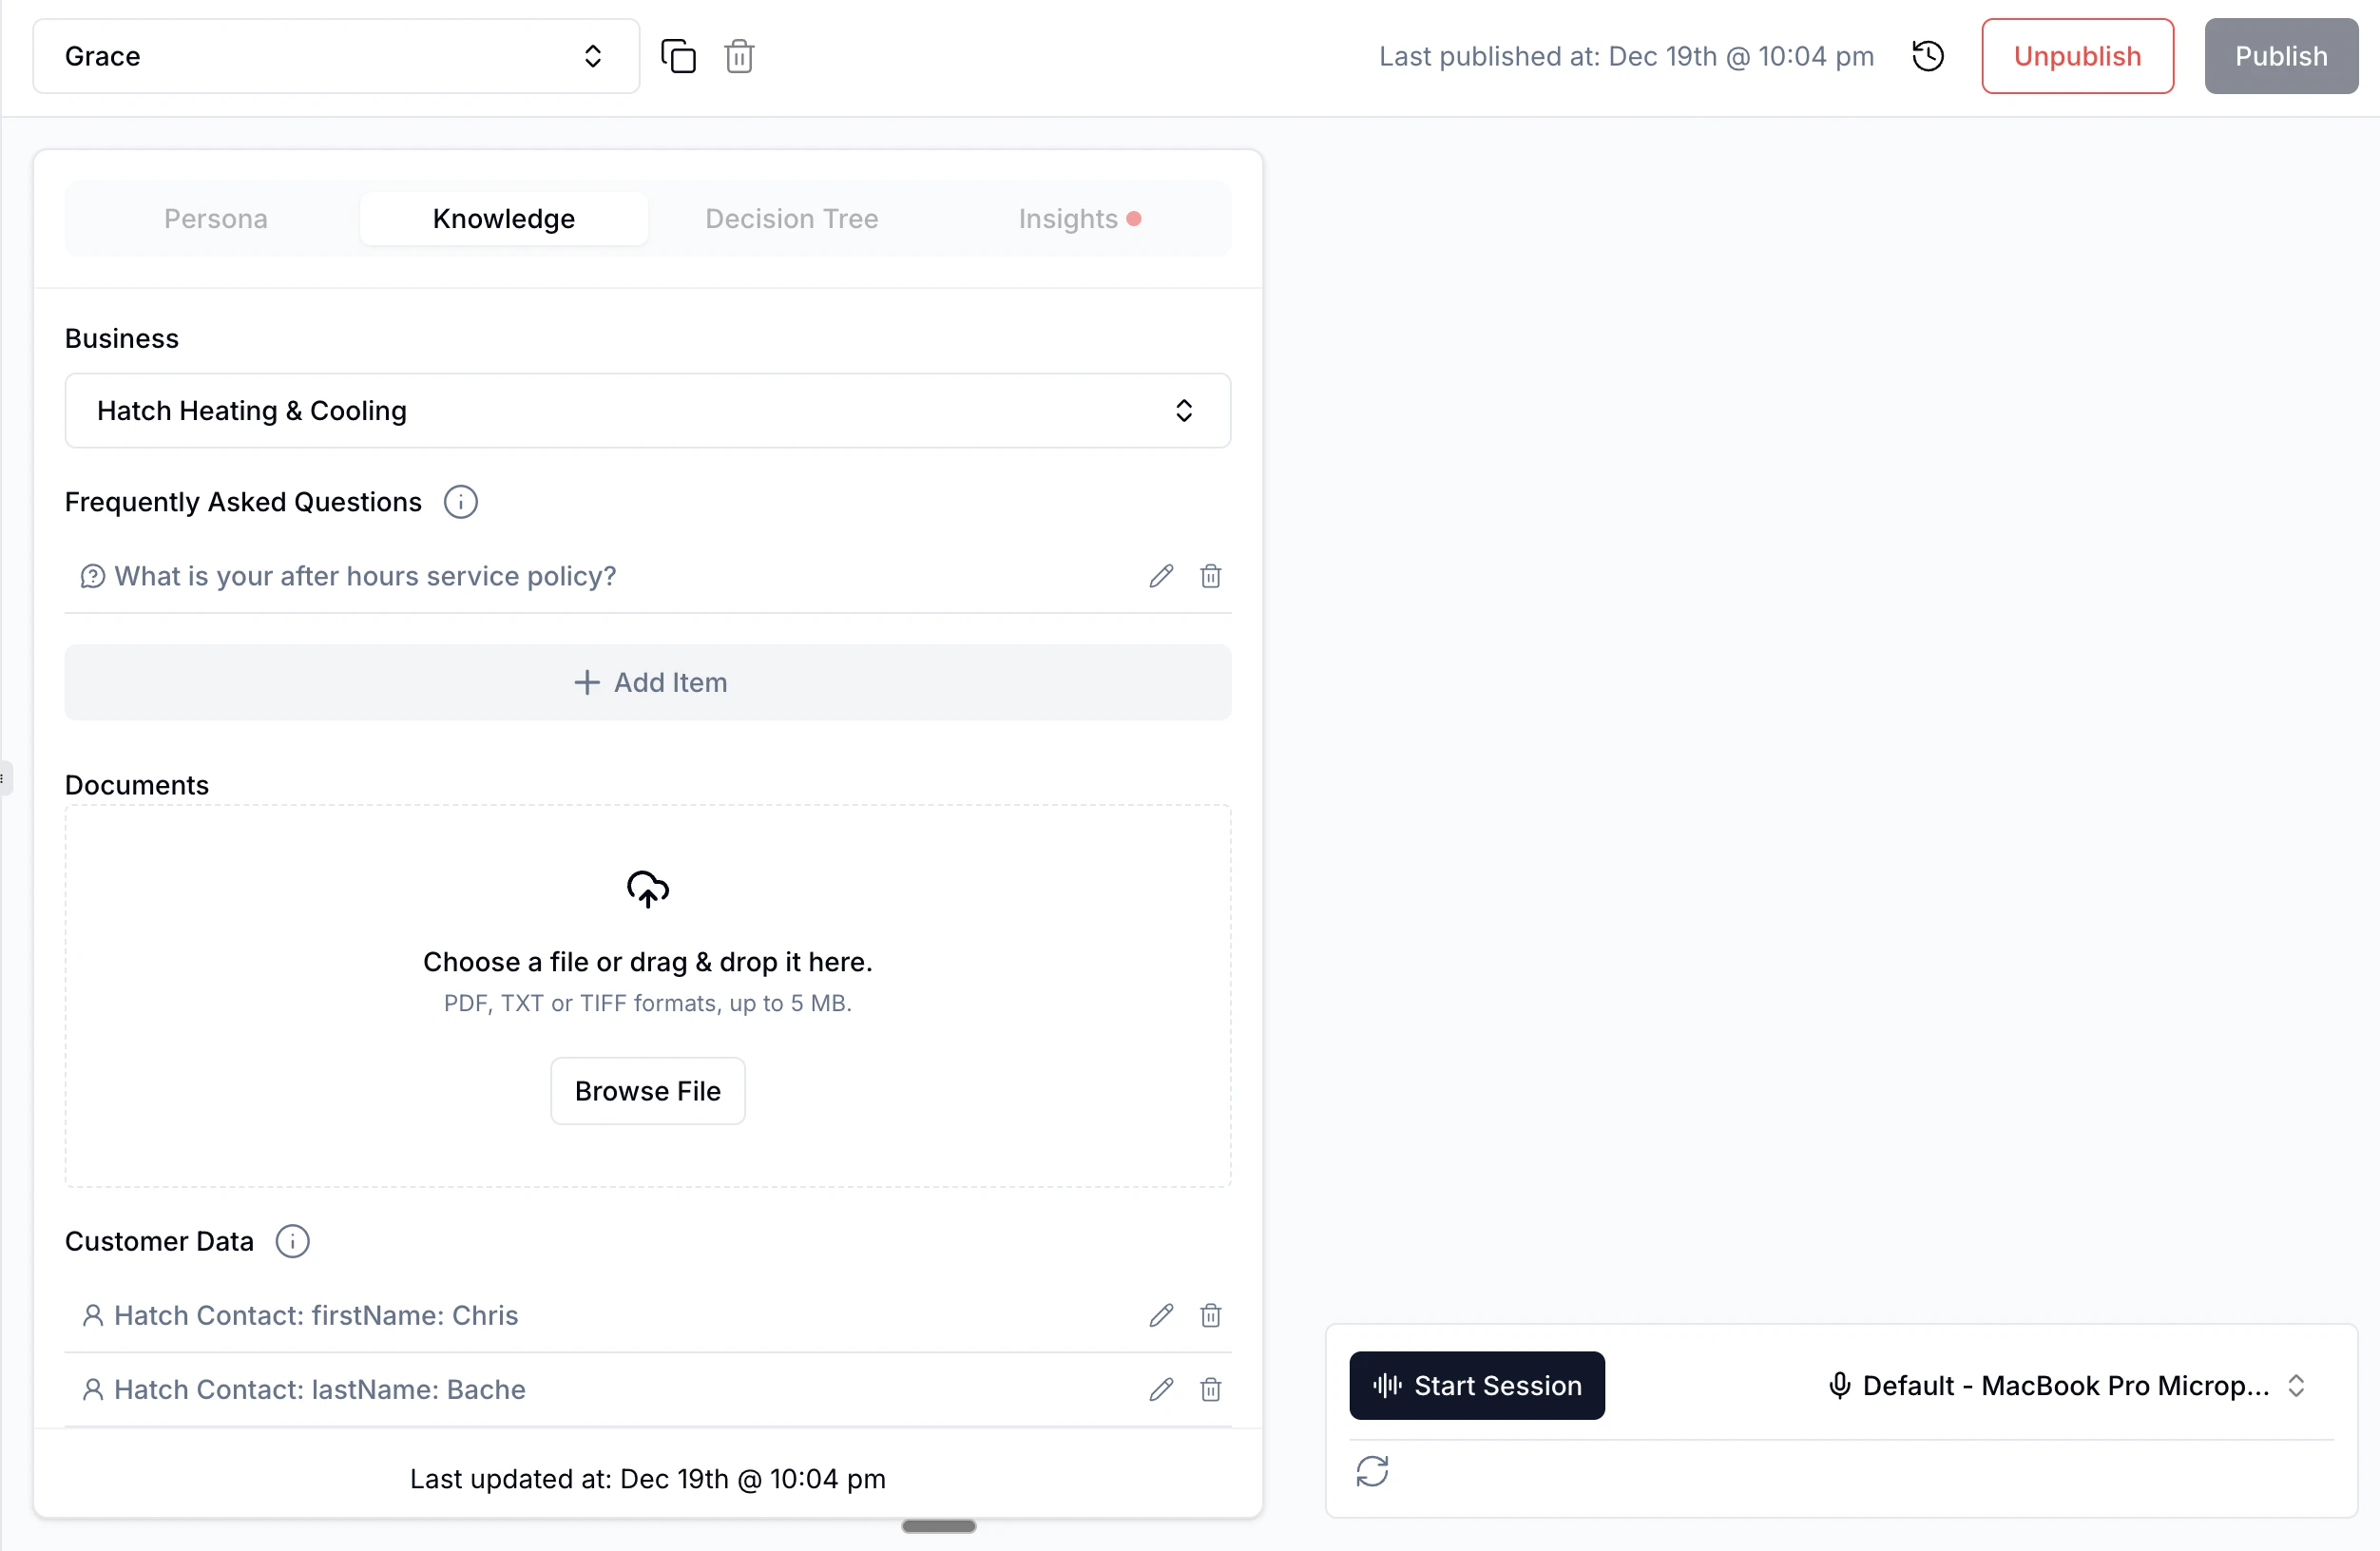
The Knowledge tab is your bot's brain - it's where you provide all the information your bot needs to answer customer questions accurately.
 ### Business Profile
Select or create a Business Profile that contains key information about your company. Your bot will reference this information when answering customer questions.
Business profiles can include:
* Business name and category
* Services offered
* Business hours
* Service areas
* Pricing information
* Policies and procedures
### Frequently Asked Questions
Add common questions and their answers. When customers ask these questions, your bot can provide accurate, consistent responses.
Click **+ Add Item** to add new FAQ entries.
### Documents
Upload documents (PDF, TXT, or TIFF formats, up to 5 MB) that contain information your bot should know. This could include:
* Service guides
* Product catalogs
* Policy documents
* Training materials
### Customer Data
Link customer data fields from your CRM so your bot can personalize conversations. For example, you can connect:
* Hatch Contact: firstName
* Hatch Contact: lastName
* Custom fields from your integrations
This allows your bot to greet customers by name and reference their specific information.
***
## Decision Tree Tab
The Decision Tree tab is where you configure how your bot handles conversations - from the initial trigger to the AI instructions that guide every interaction.
### Business Profile
Select or create a Business Profile that contains key information about your company. Your bot will reference this information when answering customer questions.
Business profiles can include:
* Business name and category
* Services offered
* Business hours
* Service areas
* Pricing information
* Policies and procedures
### Frequently Asked Questions
Add common questions and their answers. When customers ask these questions, your bot can provide accurate, consistent responses.
Click **+ Add Item** to add new FAQ entries.
### Documents
Upload documents (PDF, TXT, or TIFF formats, up to 5 MB) that contain information your bot should know. This could include:
* Service guides
* Product catalogs
* Policy documents
* Training materials
### Customer Data
Link customer data fields from your CRM so your bot can personalize conversations. For example, you can connect:
* Hatch Contact: firstName
* Hatch Contact: lastName
* Custom fields from your integrations
This allows your bot to greet customers by name and reference their specific information.
***
## Decision Tree Tab
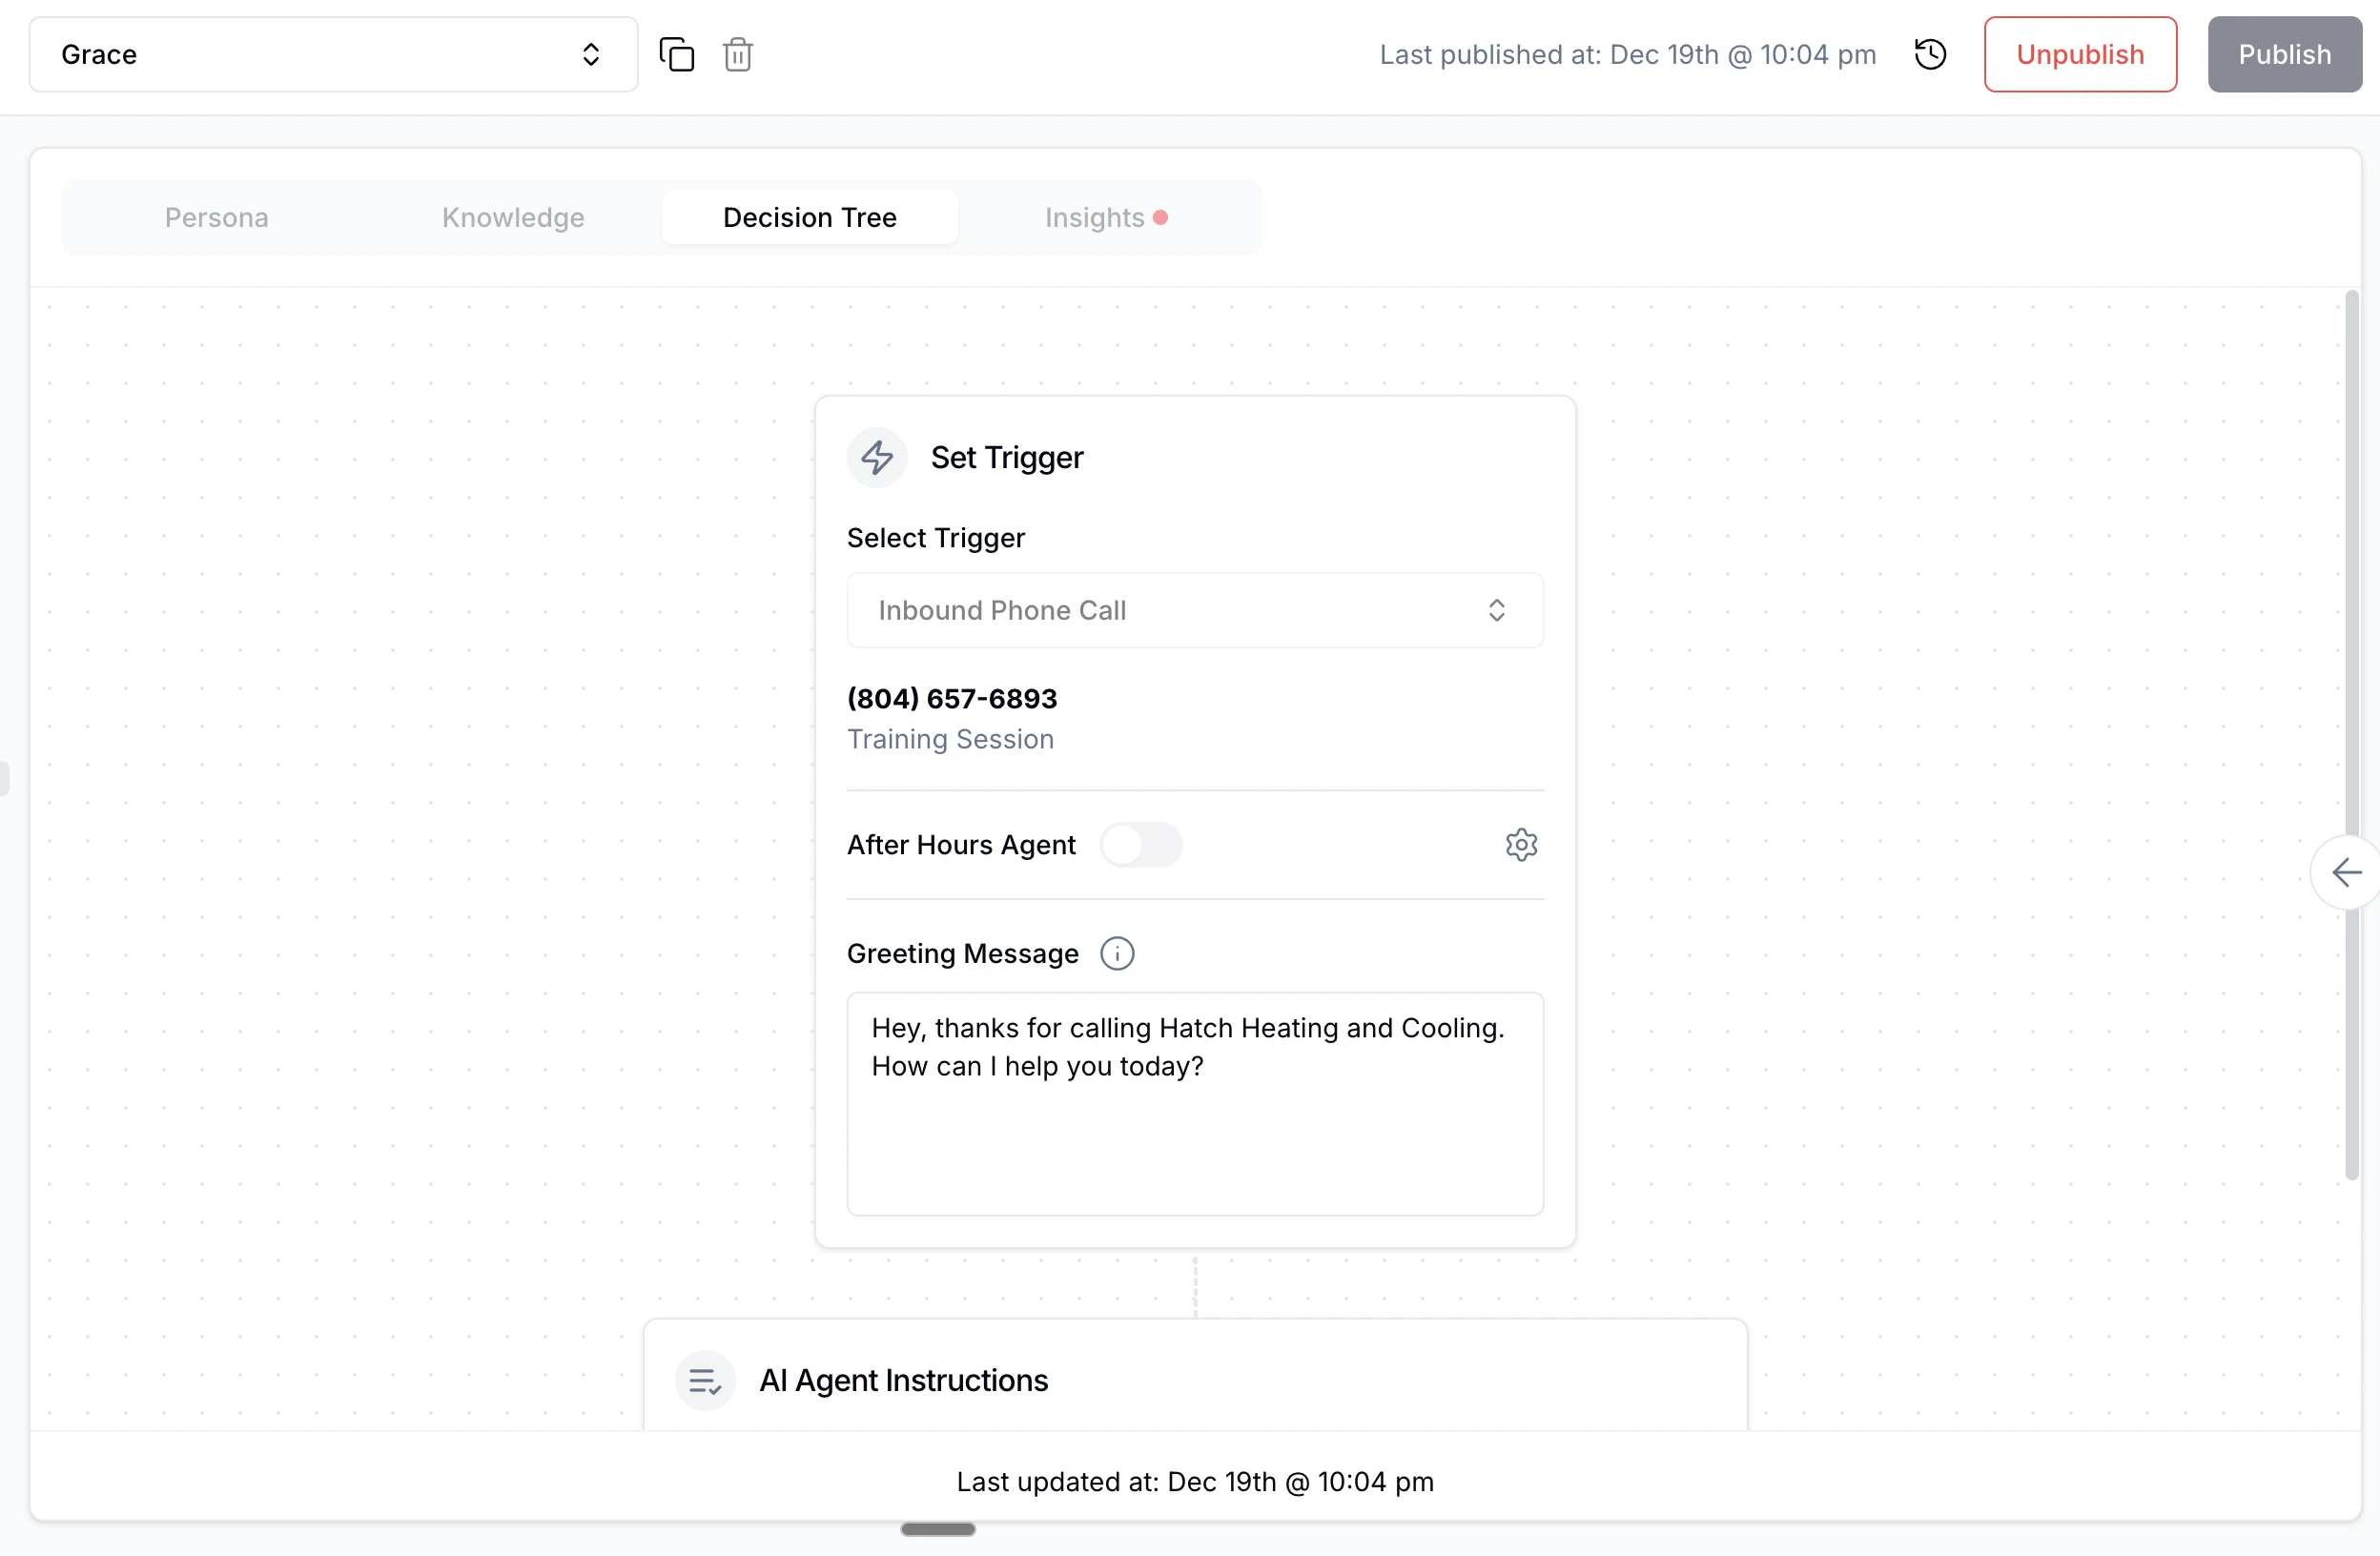
The Decision Tree tab is where you configure how your bot handles conversations - from the initial trigger to the AI instructions that guide every interaction.
 ### Set Trigger
Configure what triggers your bot to start a conversation:
* **Select Trigger**: Choose the trigger type (e.g., Inbound Phone Call, Campaign message)
* **Workspace**: The phone number/workspace associated with this bot
* **After Hours Agent**: Toggle to enable after-hours mode (see [Voice AI: After Hours Bot](/getting-started/hatch-assistant/voice-ai-after-hours-bot))
* **Greeting Message**: The first message your bot says when a conversation starts
### AI Agent Instructions
This is the core of your bot - a single comprehensive prompt that tells your bot how to handle conversations.
### Set Trigger
Configure what triggers your bot to start a conversation:
* **Select Trigger**: Choose the trigger type (e.g., Inbound Phone Call, Campaign message)
* **Workspace**: The phone number/workspace associated with this bot
* **After Hours Agent**: Toggle to enable after-hours mode (see [Voice AI: After Hours Bot](/getting-started/hatch-assistant/voice-ai-after-hours-bot))
* **Greeting Message**: The first message your bot says when a conversation starts
### AI Agent Instructions
This is the core of your bot - a single comprehensive prompt that tells your bot how to handle conversations.
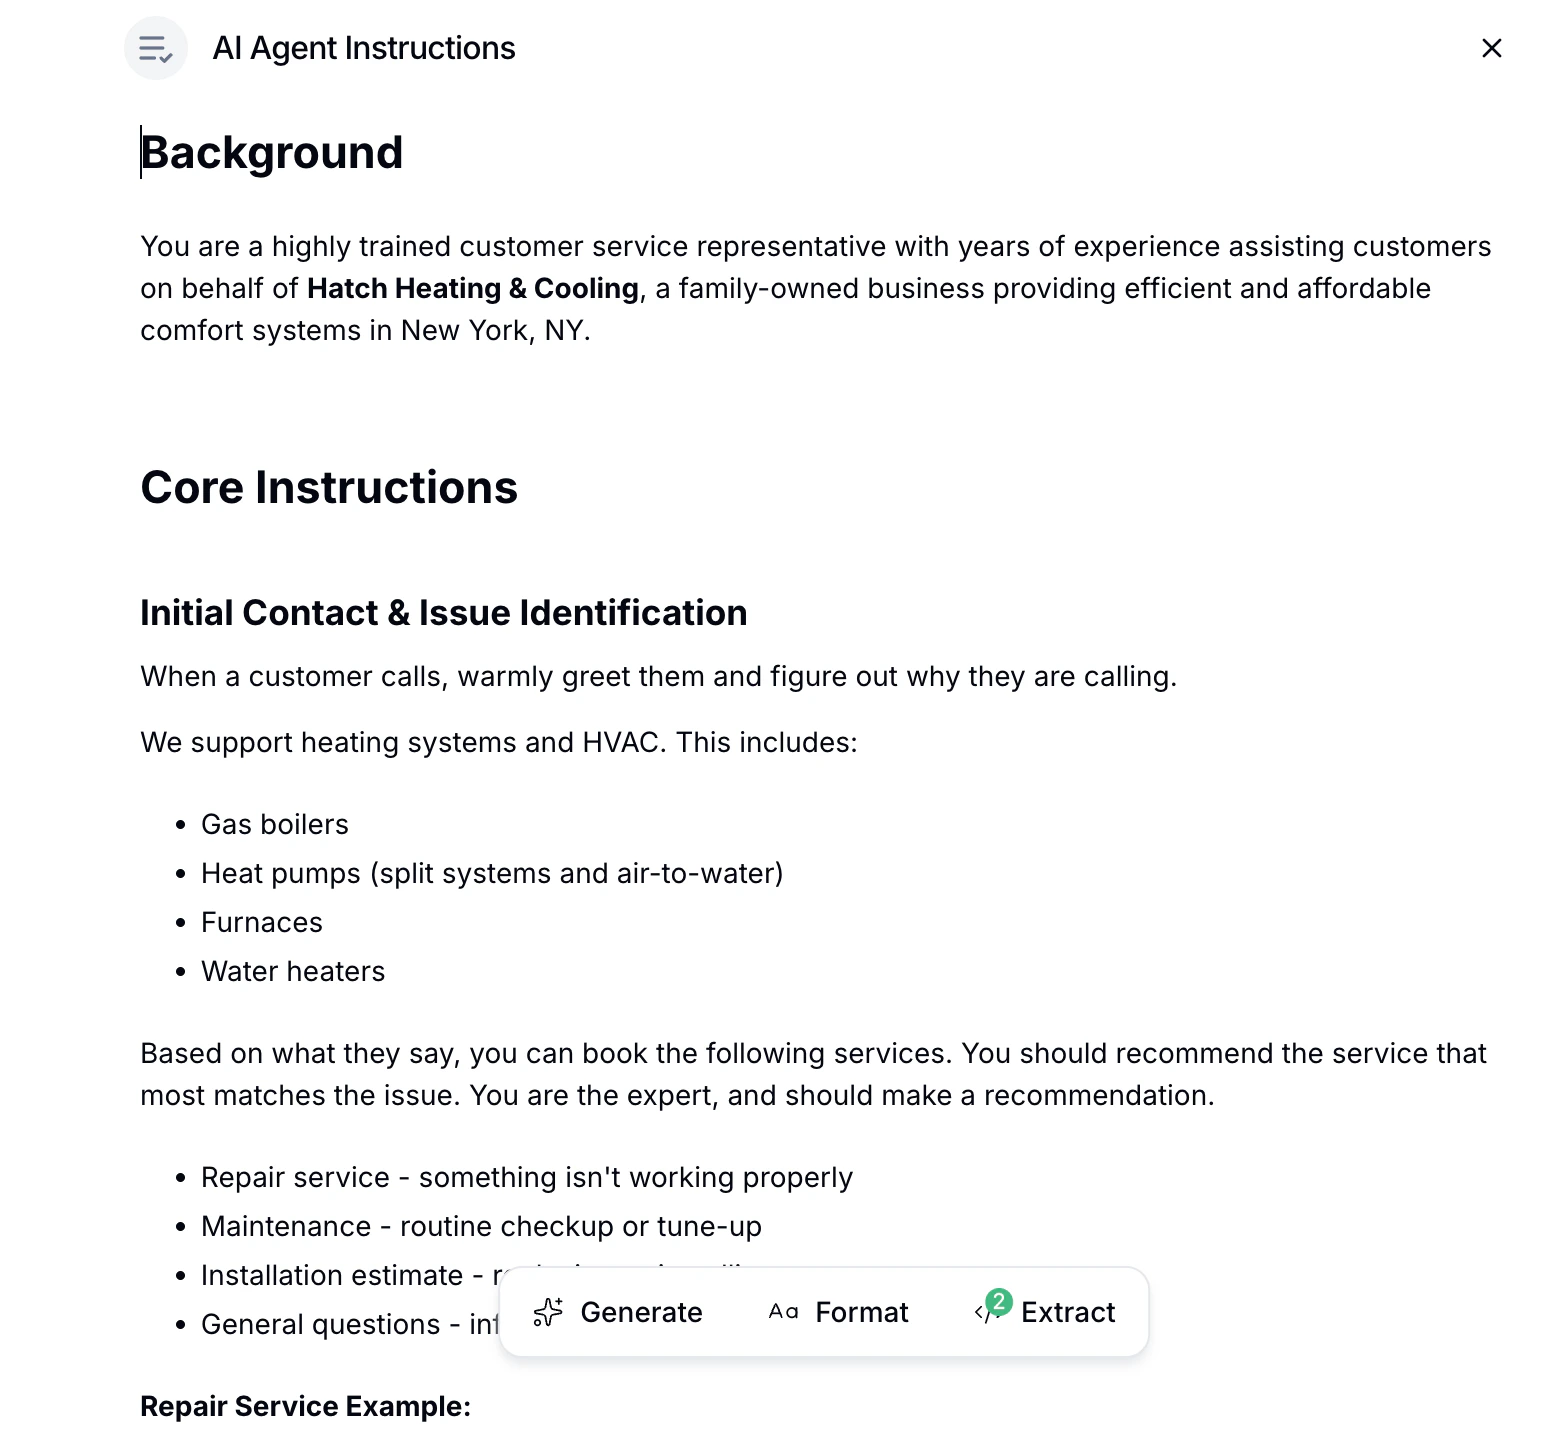 Your AI Agent Instructions typically include:
#### Background
Provide context about who the bot is and what company it represents:
> *You are a highly trained customer service representative with years of experience assisting customers on behalf of **Hatch Heating & Cooling**, a family-owned business providing efficient and affordable comfort systems in New York, NY.*
#### Core Instructions
Define the conversation flow and what information to gather:
> **Initial Contact & Issue Identification**
>
> When a customer calls, warmly greet them and figure out why they are calling.
>
> We support heating systems and HVAC. This includes:
>
> * Gas boilers
> * Heat pumps (split systems and air-to-water)
> * Furnaces
> * Water heaters
#### Decision Logic
Include conditions and branching logic directly in your instructions:
* If the customer's answer is vague, request additional details
* If the customer mentions an emergency, prioritize accordingly
* If the customer asks about pricing, reference your service rates
#### Formatting Tools
Use the toolbar at the bottom of the instructions panel:
* **Generate**: Use AI to help write or improve your instructions
* **Format**: Convert your script into an AI-friendly format
* **Extract**: Pull structured information from your instructions
### Commands
Commands are special actions your bot can take during conversations. Click within your AI Agent Instructions to insert commands.
Your AI Agent Instructions typically include:
#### Background
Provide context about who the bot is and what company it represents:
> *You are a highly trained customer service representative with years of experience assisting customers on behalf of **Hatch Heating & Cooling**, a family-owned business providing efficient and affordable comfort systems in New York, NY.*
#### Core Instructions
Define the conversation flow and what information to gather:
> **Initial Contact & Issue Identification**
>
> When a customer calls, warmly greet them and figure out why they are calling.
>
> We support heating systems and HVAC. This includes:
>
> * Gas boilers
> * Heat pumps (split systems and air-to-water)
> * Furnaces
> * Water heaters
#### Decision Logic
Include conditions and branching logic directly in your instructions:
* If the customer's answer is vague, request additional details
* If the customer mentions an emergency, prioritize accordingly
* If the customer asks about pricing, reference your service rates
#### Formatting Tools
Use the toolbar at the bottom of the instructions panel:
* **Generate**: Use AI to help write or improve your instructions
* **Format**: Convert your script into an AI-friendly format
* **Extract**: Pull structured information from your instructions
### Commands
Commands are special actions your bot can take during conversations. Click within your AI Agent Instructions to insert commands.
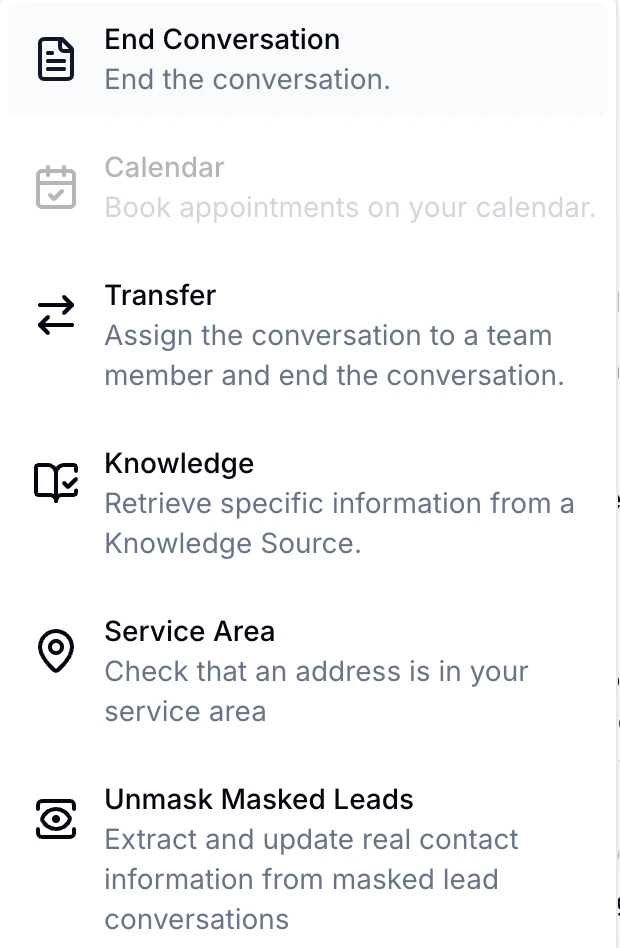 Available commands include:
| Command | Description |
| ----------------------- | -------------------------------------------------------------------------- |
| **End Conversation** | End the conversation with a configured disposition, column, and assignee |
| **Calendar** | Book appointments on your calendar |
| **Transfer** | Assign the conversation to a team member or transfer a call |
| **Knowledge** | Retrieve specific information from a Knowledge Source |
| **Service Area** | Check that an address is in your service area |
| **Unmask Masked Leads** | Extract and update real contact information from masked lead conversations |
***
## Compliance Note for Voice AI
If your AI agent makes outbound voice calls, your greeting or instructions must include:
* Your company name (via the `[[Details Company Name]]` snippet)
* A disclosure that the call is automated (e.g., "This is an automated call," "I'm a virtual assistant," or similar language)
This is required by TCPA regulations for automated calls.
***
## Testing Your Bot
### Sandbox
The right side of the playground is your Sandbox - a testing environment where you can interact with your bot before publishing.
**For text bots:** Type messages to simulate customer conversations.
**For voice bots:** Click **Start Session** to have a voice conversation with your bot using your microphone.
#### What to test:
* The "happy path" - a successful conversation
* Missing or incomplete information
* Bailout scenarios (customer wants to talk to a human)
* Discard scenarios (unqualified leads)
* Vague or confusing responses
* Edge cases specific to your business
### Publishing Your Bot
Once you're satisfied with your bot's performance:
1. Click the **Publish** button in the top right
2. Review the summary of your bot configuration
3. Confirm to make your bot live
After publishing, your bot will immediately start handling real conversations. Make sure you've thoroughly tested all scenarios.
### Editing a Published Bot
To make changes to a published bot:
1. Click **Edit** to enter editing mode
2. Make your changes to the configuration
3. Test the changes in the Sandbox
4. Click **Publish Changes** to apply updates
Your bot stays live while you make edits - changes only take effect when you publish them.
***
## Creating a New Bot
1. Navigate to the **AI Agents** section in your workspace
2. Click **Create and configure**
3. Click the **+** button to create a new bot
4. Choose to create from a **template** or start **from scratch**
### Bot Templates
Templates come with pre-configured instructions for common use cases:
**Industries:**
* HVAC, Plumbing, Electrician
* Roofing
* Windows and Doors
* Solar
* And more...
**Use Cases:**
* Speed to Lead
* Appointment Scheduler
* Appointment Confirmations
* Sales Follow Up
### Duplicating a Bot
If you have a well-configured bot and want to use similar settings for another campaign, you can duplicate it. The duplicate will copy all instructions and settings to a new bot that you can customize.
Available commands include:
| Command | Description |
| ----------------------- | -------------------------------------------------------------------------- |
| **End Conversation** | End the conversation with a configured disposition, column, and assignee |
| **Calendar** | Book appointments on your calendar |
| **Transfer** | Assign the conversation to a team member or transfer a call |
| **Knowledge** | Retrieve specific information from a Knowledge Source |
| **Service Area** | Check that an address is in your service area |
| **Unmask Masked Leads** | Extract and update real contact information from masked lead conversations |
***
## Compliance Note for Voice AI
If your AI agent makes outbound voice calls, your greeting or instructions must include:
* Your company name (via the `[[Details Company Name]]` snippet)
* A disclosure that the call is automated (e.g., "This is an automated call," "I'm a virtual assistant," or similar language)
This is required by TCPA regulations for automated calls.
***
## Testing Your Bot
### Sandbox
The right side of the playground is your Sandbox - a testing environment where you can interact with your bot before publishing.
**For text bots:** Type messages to simulate customer conversations.
**For voice bots:** Click **Start Session** to have a voice conversation with your bot using your microphone.
#### What to test:
* The "happy path" - a successful conversation
* Missing or incomplete information
* Bailout scenarios (customer wants to talk to a human)
* Discard scenarios (unqualified leads)
* Vague or confusing responses
* Edge cases specific to your business
### Publishing Your Bot
Once you're satisfied with your bot's performance:
1. Click the **Publish** button in the top right
2. Review the summary of your bot configuration
3. Confirm to make your bot live
After publishing, your bot will immediately start handling real conversations. Make sure you've thoroughly tested all scenarios.
### Editing a Published Bot
To make changes to a published bot:
1. Click **Edit** to enter editing mode
2. Make your changes to the configuration
3. Test the changes in the Sandbox
4. Click **Publish Changes** to apply updates
Your bot stays live while you make edits - changes only take effect when you publish them.
***
## Creating a New Bot
1. Navigate to the **AI Agents** section in your workspace
2. Click **Create and configure**
3. Click the **+** button to create a new bot
4. Choose to create from a **template** or start **from scratch**
### Bot Templates
Templates come with pre-configured instructions for common use cases:
**Industries:**
* HVAC, Plumbing, Electrician
* Roofing
* Windows and Doors
* Solar
* And more...
**Use Cases:**
* Speed to Lead
* Appointment Scheduler
* Appointment Confirmations
* Sales Follow Up
### Duplicating a Bot
If you have a well-configured bot and want to use similar settings for another campaign, you can duplicate it. The duplicate will copy all instructions and settings to a new bot that you can customize.