> ## Documentation Index
> Fetch the complete documentation index at: https://docs.usehatchapp.com/llms.txt
> Use this file to discover all available pages before exploring further.
# Hatch Chat Overview
In this article, we’ll cover the basics of Hatch Chat including what it does, how to set it up, and frequently asked questions.
### **Hatch Chat Overview**
Hatch Chat allows you to connect with your customers directly from your website.
It is *similar* to a traditional webchat, except when the customer submits a message, the conversation continues on their cell phone over text messaging. This allows you to continue the conversation with the contact **even after they leave your website**.
#### Here’s how it works
The Hatch Chat widget is added to your website using a simple-to-install snippet of code. Once set up, the pop-up looks like this and can appear on every page where you put the code snippet.
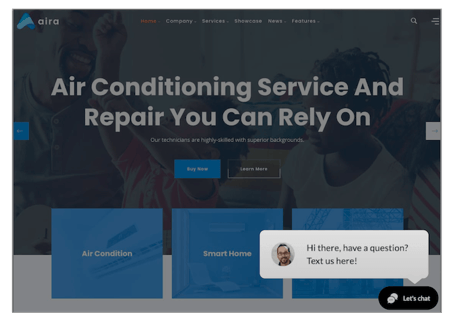 *Here is an example of Hatch Chat on our Website.*
When a customer requests to chat, it will ask them to add their cell number and their message.
*Here is an example of Hatch Chat on our Website.*
When a customer requests to chat, it will ask them to add their cell number and their message.
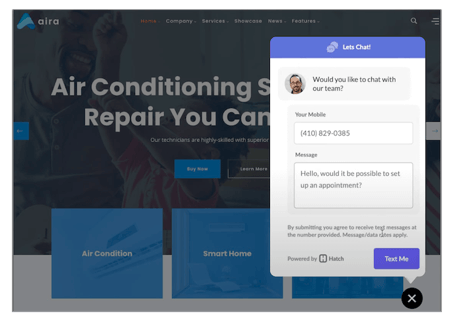 If they visit your site on their mobile device, it will automatically open their text messaging function and pre-populate a message.
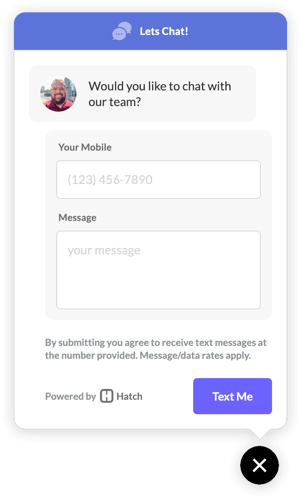
*Here is an example of Hatch Chat on a Mobile Device.* \
If they visit your site on their mobile device, it will automatically open their text messaging function and pre-populate a message.
*Here is an example of Hatch Chat on a Mobile Device.* \
 \
Once they submit the message, there are two ways you can handle these inbound messages.
1. You can have them **show up in your Hatch workspace, in the INBOX column** , where you can easily text those customers back.
2. You can set it up to have those **contacts immediately launch into a campaign** , ensuring an instantaneous response.
In Hatch, you will see the message submitted through the website pop into the inbox column.
If their number is already in your Contacts, it will show their name instead of just a number.
For the customer, they will see the first message you send back pop up on their phone. Make sure to introduce yourself!
We also recommend putting the customer into a campaign for gentle follow up. See our suggested campaign verbiage [here](/integrations/lead-sources/hatch-chat-overview).
### **Setting Up**
Setting Up Hatch Chat is easy! It just might require a little work from the team that handles your website.
#### Creating the Snippet
Before installing the snippet, you'll need to modify the snippet below, so it's unique to your account.
1. Determine **which Hatch Workspace** you would like the leads to come into.
1. Open up the workspace in another tab.
2. The **Workspace\_ID** is the string of seemingly random letters and numbers in the URL of the workspace.
\
Once they submit the message, there are two ways you can handle these inbound messages.
1. You can have them **show up in your Hatch workspace, in the INBOX column** , where you can easily text those customers back.
2. You can set it up to have those **contacts immediately launch into a campaign** , ensuring an instantaneous response.
In Hatch, you will see the message submitted through the website pop into the inbox column.
If their number is already in your Contacts, it will show their name instead of just a number.
For the customer, they will see the first message you send back pop up on their phone. Make sure to introduce yourself!
We also recommend putting the customer into a campaign for gentle follow up. See our suggested campaign verbiage [here](/integrations/lead-sources/hatch-chat-overview).
### **Setting Up**
Setting Up Hatch Chat is easy! It just might require a little work from the team that handles your website.
#### Creating the Snippet
Before installing the snippet, you'll need to modify the snippet below, so it's unique to your account.
1. Determine **which Hatch Workspace** you would like the leads to come into.
1. Open up the workspace in another tab.
2. The **Workspace\_ID** is the string of seemingly random letters and numbers in the URL of the workspace.  2. Copy the snippet below and replace **Workspace\_ID with your Hatch Workspace Number.**
**Snippet**
```text theme={null}
```
#### **Installing the Snippet**
Once you have your unique snippet created, then it is time to install Hatch Chat. We recommend using Google Tag Manager or installing the snippet directly into your `` tag on your website.
Google Tag Manager
1. Go to [tagmanager.google.com](http://tagmanager.google.com/) and login to your account.
2. Select **Add a New Tag**.
3. Name the tag “Hatch" (or whatever you'd like).
4. Select **Choose a Tag Type** and choose **Custom HTML**.
5. Paste the Hatch Chat Snippet you generated above. Make sure "WORKSPACE\_ID\_GOES\_HERE” is replaced with the board number you’d like messages to go to.
6. Scroll down and select **Triggering**. We want to create a trigger that tells the tag to fire (load) after the page is fully loaded. This will ensure all your site’s content loads before Hatch Chat.
7. Select **+** to add a new trigger.
8. Name your trigger “Window Loaded” and select **Choose a trigger type**.
9. Select **Window Loaded**.
10. Click **Save**
11. When you’re ready to deploy the tag on your website, hit **Submit**.
12. **Confirm that Hatch Chat is displaying on your site**. Once you have the snippet installed, the Hatch Chat widget will be visible on the bottom right of your website.
Head Tag
1. **Identify the `` tag section** of your website.
2. **Paste the Hatch Chat Snippet** you generated above. Make sure "WORKSPACE\_ID\_GOES\_HERE” is replaced with the your workspace ID you’d like messages to go to, as outlined above.
3. **Publish** your changes.
4. **Confirm that Hatch Chat is displaying on your site**. Once you have the snippet installed, the Hatch Chat widget will be visible on the bottom right of your website.
#### Customizing the Chat Image
The default friendly face associated with Hatch chat is that of one of our co-founders, Bill! While *we* think he has a great face, we realize you might want to personalize this image to your own business.
The Hatch chat image can now be customized in the Hatch workspace settings:
1. Navigate to the appropriate workspace
2. Navigate to the workspace configuration
3. Click Edit under the General settings
4. Upload a new image
2. Copy the snippet below and replace **Workspace\_ID with your Hatch Workspace Number.**
**Snippet**
```text theme={null}
```
#### **Installing the Snippet**
Once you have your unique snippet created, then it is time to install Hatch Chat. We recommend using Google Tag Manager or installing the snippet directly into your `` tag on your website.
Google Tag Manager
1. Go to [tagmanager.google.com](http://tagmanager.google.com/) and login to your account.
2. Select **Add a New Tag**.
3. Name the tag “Hatch" (or whatever you'd like).
4. Select **Choose a Tag Type** and choose **Custom HTML**.
5. Paste the Hatch Chat Snippet you generated above. Make sure "WORKSPACE\_ID\_GOES\_HERE” is replaced with the board number you’d like messages to go to.
6. Scroll down and select **Triggering**. We want to create a trigger that tells the tag to fire (load) after the page is fully loaded. This will ensure all your site’s content loads before Hatch Chat.
7. Select **+** to add a new trigger.
8. Name your trigger “Window Loaded” and select **Choose a trigger type**.
9. Select **Window Loaded**.
10. Click **Save**
11. When you’re ready to deploy the tag on your website, hit **Submit**.
12. **Confirm that Hatch Chat is displaying on your site**. Once you have the snippet installed, the Hatch Chat widget will be visible on the bottom right of your website.
Head Tag
1. **Identify the `` tag section** of your website.
2. **Paste the Hatch Chat Snippet** you generated above. Make sure "WORKSPACE\_ID\_GOES\_HERE” is replaced with the your workspace ID you’d like messages to go to, as outlined above.
3. **Publish** your changes.
4. **Confirm that Hatch Chat is displaying on your site**. Once you have the snippet installed, the Hatch Chat widget will be visible on the bottom right of your website.
#### Customizing the Chat Image
The default friendly face associated with Hatch chat is that of one of our co-founders, Bill! While *we* think he has a great face, we realize you might want to personalize this image to your own business.
The Hatch chat image can now be customized in the Hatch workspace settings:
1. Navigate to the appropriate workspace
2. Navigate to the workspace configuration
3. Click Edit under the General settings
4. Upload a new image 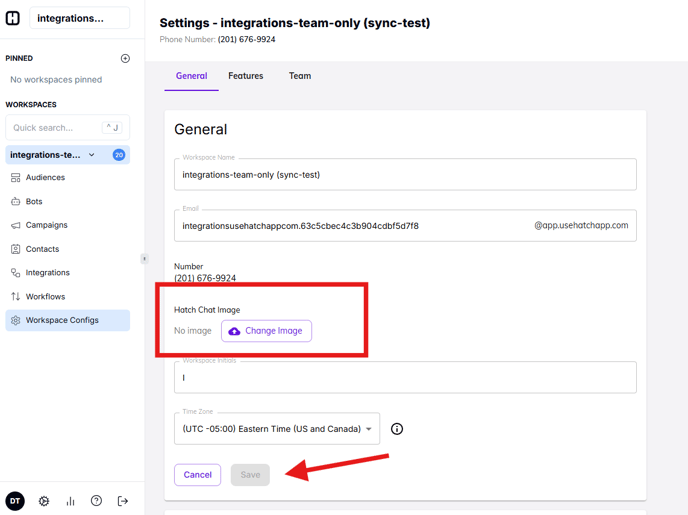 5. Don't forget to Save!
### **Putting Contacts into Campaign**
You can use Instant Lead Engagement to allow Hatch to **automatically** follow up with contacts with text and/or voicemail after they fill out the form on your website.
Here is our recommended verbiage for Hatch Chat follow-up:
**Touch 1, When Lead Comes In** Hi, this is **\[\[User First Name]]** with **\[\[Details Company Name]]**. Thanks for texting us! Can you tell me more about what you need help with? If you'd rather not talk over text, reply END.
**Touch 2, Day 2 at 10:00 AM** Thanks again for texting us the other day. I didn’t hear back from you, text me back with what you need help with, I'm here to help. **Touch 3, Day 3 at 2:00 PM** Hi **\[\[Contact First Name]]** , it's **\[\[Details Company Name]]**. Text me back when you have some time so I can help you out! **Touch 4, Day 5 at 9:00 AM** Hi **\[\[Contact First Name]]** , it's **\[\[Details Company Name]]**. If you ever need help with anything, text me at this number!
Work with your Account Manager to customize your messaging based on the needs of your business.
### **Frequently Asked Questions**
The image that shows in the Hatch Chat Embed can be changed in the Hatch workspace configuration settings. Refer to the [setup instructions](/integrations/lead-sources/hatch-chat-overview#customizing-the-chat-image) above.
At this time, the verbiage can not be adjusted.
At this time, the color can not be changed.
At this time, the position or size can not be changed.
5. Don't forget to Save!
### **Putting Contacts into Campaign**
You can use Instant Lead Engagement to allow Hatch to **automatically** follow up with contacts with text and/or voicemail after they fill out the form on your website.
Here is our recommended verbiage for Hatch Chat follow-up:
**Touch 1, When Lead Comes In** Hi, this is **\[\[User First Name]]** with **\[\[Details Company Name]]**. Thanks for texting us! Can you tell me more about what you need help with? If you'd rather not talk over text, reply END.
**Touch 2, Day 2 at 10:00 AM** Thanks again for texting us the other day. I didn’t hear back from you, text me back with what you need help with, I'm here to help. **Touch 3, Day 3 at 2:00 PM** Hi **\[\[Contact First Name]]** , it's **\[\[Details Company Name]]**. Text me back when you have some time so I can help you out! **Touch 4, Day 5 at 9:00 AM** Hi **\[\[Contact First Name]]** , it's **\[\[Details Company Name]]**. If you ever need help with anything, text me at this number!
Work with your Account Manager to customize your messaging based on the needs of your business.
### **Frequently Asked Questions**
The image that shows in the Hatch Chat Embed can be changed in the Hatch workspace configuration settings. Refer to the [setup instructions](/integrations/lead-sources/hatch-chat-overview#customizing-the-chat-image) above.
At this time, the verbiage can not be adjusted.
At this time, the color can not be changed.
At this time, the position or size can not be changed.